We survived! Basically the biggest reason I can blame for my lack of blogging lately is the art show that we had at our school last week. I know, it has now been a week and a half since we put it up and open for the parents, but it hasn't been until now that I have felt like I have been caught up on everything that I neglected while getting ready for the show.
When I interviewed for this position, my principle talked a lot about having quality are projects and also good art shows. He stressed that it would take a lot of planning, preparation and time and wanted to make sure I was up for that task. I have really felt that this first art show was an important way to showcase the art program we have here to the parents and the community. As my position is funded by a legislature-passes grant that ends this year, this show was particularly important. We invited members of our local legislature to attend so that they could see how the arts are enriching core, curriculum learning in the classroom at Edgemont and hopefully get their vote to continue funding.
The art show opened thirty minutes before the upper-grades' Christmas concert. All of the faculty who came, as well as the principle said that they have never seen so many parents in attendance to either kind of event like that at our school. It was very exciting! The lunch room was so crowded for the concert to begin that there wasn't hardly standing room left.
I cannot even express how grateful I am to all of the parent volunteers and other teachers who pitched in to help make this happen. I truly would not have happened without their help. Thank you soooo much!
Here are just a few pictures from the night:
Thanks to Kristen Moore, the school librarian, for letting us put a ton of artwork up in the library. This is a great shot of our 4th grade pottery with the 6th grader's pots and Egyptian death masks in the background. In the top left corner you can see the writing that was done by students to explain their projects and how they went along with what they were learning with their classroom teacher.
Our school has a duel-language, French immersion program is 1st and 2nd grades so far. So, both classes wrote their artist statements in English as well as in French.
A few more projects that you might recognize:
p.s. Another great story to go along with this: If you look at the picture above, you may not notice at first, but the hallways of Edgemont were brighter for the art show than they have been all year. Because of budget cuts, every-other light fixture in the halls had been wired not to turn on. I never really noticed how dark the hallways were until we were hanging the art show and noticed the problem. I talked to my principle about it and he explained the situation and said he would see what he could do. The next day (the day of the show) we saw a man on a ladder all day re-wiring the lights just for us! They are still on, but I am sure will be going off soon.
Thanks for the light! It really made such a difference.
12.17.2010
2nd Grade Christmas Wreathes
So, I am not one for a lot of Christmas crafty art lessons, but the second grade classes really were just talking about holidays and traditions for the bulk of December. So, we talked about the symbolism of wreaths and put our origami skills to the test.
Each student folded 8 points for their wreathes and then glued them together. After, they had time to decorate them with glitter-glue and we hung their school picture in the middle.
They have been finished for about 2 weeks, and they finally get to take them home today to give their parents as a gift. These little kids are just about as close as they can get to exploding with excitement to give these to their parents.
Here is an example of a finished product (sorry, it's my picture in the place of a cuter 2nd grader):
If they are happy, I am happy!
A little Christmas Cheer: 1st Grade Ornaments
This was a really fun, easy way to let some of my youngest students experience clay and the process of kiln firing, as well as making their own textures.
I just rolled out a big slab and cute everyone about a 2 1/2" disk. Gave them a few tools, like popsicle-sticks :), and showed them how to make a Christmas tree. They were fired and then I let them go at painting.
Something that really helped give them an extra pop was that we dipped them in a wash of their choice, green or red, to help fill in the cracks and to moisten the bisque-ware to help the paint glide on more smoothly.
Everyone was all smiles!
12.09.2010
Colonial Mural
Just finished a massive project with the fifth grade. Each class made a colonial style village mural. Each student was assigned a different trade/shop and needed to research it enough that they would be able to create a building for that shop. We spent some time learning 1 point perspective so they could put their buildings into perspective, drawing and painting their buildings one at a time and then assembling them onto a mural and completing the background. It was a very long project, but they actually turned out quite nicely, if I do say so myself.
11.29.2010
Springville Museum of Art: 25th Annual Christmas Lamb
So, can I just be so proud and brag for a little bit?
Each year, the Springville Museum of Art hosts a show called the "Christmas Lamb" to celebrate the true spirit of Christmas. They receive over 350 artworks done by elementary students from all around Utah County each year and accept only 70.
2 of my wonderfully creative and talented students from my after school classes had artwork accepted! Next time, hopefully, there will be more, but I am so proud of them.
Their artwork will be on display at the museum Dec. 4-28, 2010.
Here is my second grader's entree: Christmas Tree
And my fifth grader's: The Angel Announces the Birth of Jesus
11.22.2010
Greek Pots, take one
My sixth grade classes have just about finished a huge unit of Greek pottery. We took a few weeks to design 2D pots with crayon, oil pastel and toothpicks for a little something like this:
Then, we spend the next 4 weeks or so actually making the pots that they designed out of red clay and coils. Their pots have been drying now for almost 2 weeks, and after the break we will be painting them with a black underglaze, and then finally firing them! I am excited to be done, but mostly excited to have my desk and counter space back. Right now, it is completely taken over by drying pots.
So, I probably won't have much to say for a week or so. Off to Washington to see the in-laws for Thanksgiving! Yay! I am so ready for a little break.
11.19.2010
A lesson in color mixing
Dick Blick has some really great tempera paints that come in dried cake form, like huge watercolors, that can create a translucent effect like watercolors but also can be opaque. They are great for color mixing as well.
Last week in my first grade classes we talked about how we can apply the ideas of addition and subtraction to mixing colors. They have learned a lot about the primary colors and what colors they make, but so far it has all been theory. So the last few classes we had, we put our color theory to practice.
Needless to say, they had a ton of fun.
I made (I hate to say "worksheet" but what else can I call it?) a worksheet to guide them through the mixing process and copied it onto a heavier drawing paper that would hold the paint, and they set to work.
The finished products looked something like this: (I know, the pics aren't the greatest quality, but you get the idea, right?)
Last week in my first grade classes we talked about how we can apply the ideas of addition and subtraction to mixing colors. They have learned a lot about the primary colors and what colors they make, but so far it has all been theory. So the last few classes we had, we put our color theory to practice.
Needless to say, they had a ton of fun.
I made (I hate to say "worksheet" but what else can I call it?) a worksheet to guide them through the mixing process and copied it onto a heavier drawing paper that would hold the paint, and they set to work.
The finished products looked something like this: (I know, the pics aren't the greatest quality, but you get the idea, right?)
11.18.2010
Treasure Island
So my second graders spent a week or two learning about maps. How to read maps, the different important parts of maps, how to use them, and why we have them. All that fun stuff...So naturally we had to make one, but in order to make it fun, they were able to design their own Treasure Island. They were required to have a title, key/legend, scale, compass rose, and of course an island. I was pretty happy with how they turned out after I drilled into their heads how to use "short strokes, close together" to make the colored pencil turn out nicely.
This one below was done by one of my favorite little boys. (He is really cute--you know, the kind you can tell is going to grow up to be good looking, really athletic and very friendly. But he is not the typical sports-playing-popular-cute-boy. He works really really hard and always does his best and never gets into trouble. He's gonna be a heart breaker, I can already tell.)
After they finished their maps, we made treasure boxes out of origami. I gave them a little plastic jewel to glue on top, and glitter glue for decoration. To be honest, I was really surprised how much they LOVED making these. They couldn't stop talking about all the little things they were going to hide inside their treasure boxes when they took them home.
11.16.2010
City Scapes
Second grade. What a great time to be alive. You have had a year plus to adjust to all day school, have pretty much learned the importance of keeping your hands to yourself, but still live in a world of innocence and bliss. For some reason, that is what I think of when I see this project that we completed. It took us a good 4-5 class periods to finish, but I know they actually learned something.
So, the 2nd grade core concept that we talked about was communities, how they can be different and like our own, and we talked about cities.
In art, we learned a lot about textures, crayon rubbings, and watercolor techniques. It was so much fun. But I cannot take all of the credit. I totally got the idea here. Thanks again, Kathy.
So here they are. Agian, how can I help but be proud?!
11.11.2010
Jasper Johns inspired number painting
Can I just say, I love kindergarteners? They are so cute, and pure and willing to learn. They literally are dry sponges waiting to soak up whatever you are willing to offer them.
Over the last few weeks, they have really been working on mastering their numeral writing skills. Yeah, that's right, just learning how to write the numbers. I was instantly inspired to help them learn about an artist, Jasper Johns, who uses themes like the numbers, maps, flags and other symbols from popular culture to create beautiful encaustic paintings.
So, of course we did our own version. The first day, students were given a template with numbers 0-9 and we practiced writing each of the numbers to a cute little song. Then in each number's rectangle, we drew that number of something. So for example, in the box with the #6 we drew 6 spirals in crayon, and the next day painted a watercolor pattern over the top.
Sir Ken Robinson
Ever heard of TED talks?
This is a really, really inspiring one. Ken Robinson talks about how "schools kill creativity."
He has some really great points in this talk. It is about 20 min long, so if get a chance, it will be worth every minute you spend watching it.
So for some reason, if you are checking this blog on google's Reader, the video is not showing up. If you visit my actual blog, you will find the video. :)
11.10.2010
Klimt Self Portraits
I have talked about Gustave Klimt a few times on this blog before. Once when I featured him as an artist of the week, and another time here, when I completed a portrait of my friend inspired by his work.
Well, here is another one. This is a project that I did with my 3rd graders when they were in the middle of 2 units. One, talking about their bodies, and the other was while they were writing "star reports"--stars as in the stars in the sky, comets, metiers, black holes, and other things that you would find in outer space. I went into their class a few days before we stared and took pictures of each of them. Then printed the pics and when they came into class, we wrapped it all together with the help and inspiration of Klimt. They had to cut out their face and arms, glue them onto black construction paper and then draw their bodies, a border and background using simple shapes--shapes of things you would find in outer space. They first used oil pastels to fill the space with patterns, and then went back and added another layer with metallic sharpies.
I love how they turned out, and I know that the students had a lot of fun.
Utah Landscapes
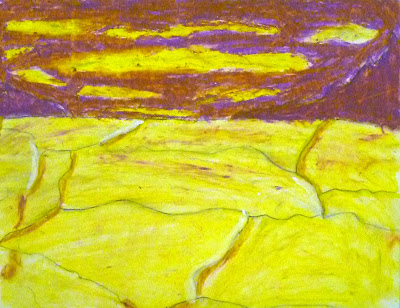
This project was to help 4th graders learn about the 3 major regions of Utah: the Rocky Mountains, Great Basin, and the Colorado Plateau. We incorporated the art ideas of impressionism and used oil pastels and complementary colors to create landscapes. The students chose one of three black a white photographs to copy. They were only allowed to use 3 colors: two compliments and white. Before they could start adding oil pastels to their drawings, I had them complete a value scale to practice blending their pastels and to figure out which colors they should use.
Here are some completed of the Rocky Mountains:
This is the Colorado Plateau:
And here are 2 of the Great Basin: (the photo they copied was of the Salt Flats)
One of the highlights of this project for me was, we got to finish it up with a field trip to go see this exhibit at the BYU Museum of Art.
Here are some completed of the Rocky Mountains:
This is the Colorado Plateau:
And here are 2 of the Great Basin: (the photo they copied was of the Salt Flats)
One of the highlights of this project for me was, we got to finish it up with a field trip to go see this exhibit at the BYU Museum of Art.
11.06.2010
Mondrian inspired compositions
One thing that is great about the kindergarten and 1st grade core subjects is that there is so much overlap between what they learn in the classroom and what is in the art core. This was a simple lesson for 1st graders about horizontal and vertical lines and the primary colors. I cut black strips of paper and had students glue 5 horizontal/vertical lines anywhere on the page (accept the edges). Then the next week, they painted one square yellow, blue and red. It was great fun.
Subscribe to:
Posts (Atom)